Is your Lenovo laptop not detecting external monitor connected via HDMI? If yes, you are not alone.
Many Lenovo laptop models, including IdeaPad, Carbon X1, ThinkBook, ThinkPad, Legion, Yoga, V series, etc. face this problem where the laptop won’t recognize the second monitor.
Well, the good news is that it can be easily fixed in less than two minutes. If your Lenovo laptop does not detect the monitor or the monitor stays on a black screen after connecting to your Lenovo laptop, follow the steps below.
The guide applies if you connected your Lenovo laptop to the monitor via HDMI, USB Type-C, or display port.
How To Fix Lenovo Laptop Not Detecting Monitor?
If your Lenovo laptop is not detecting the monitor, turn off the laptop and press and hold the reset button for 7 seconds. If that doesn’t help, open monitor settings and ensure you select the correct source input. Factory reset the monitor and update the graphics driver as well.
Press The Reset Button On Your Lenovo Laptop
One method that has helped many people fix their Lenovo laptop not detecting monitor issues is to reset the laptop using the reset button on the back or from the BIOS.
Before trying any other troubleshooting steps, do this first, and if it doesn’t help, try the other methods below.
If your Lenovo laptop has a physical reset button, follow the steps below. If not, follow the next section to reset your laptop via BIOS.
Reset using the reset button:
Shut down your Lenovo laptop and close the lid.
Turn your laptop upside down and place it on the table.
Closely examine the backside of your laptop and see if you can find a reset pinhole. Refer to the image to see the reset button placement on your Lenovo laptop.
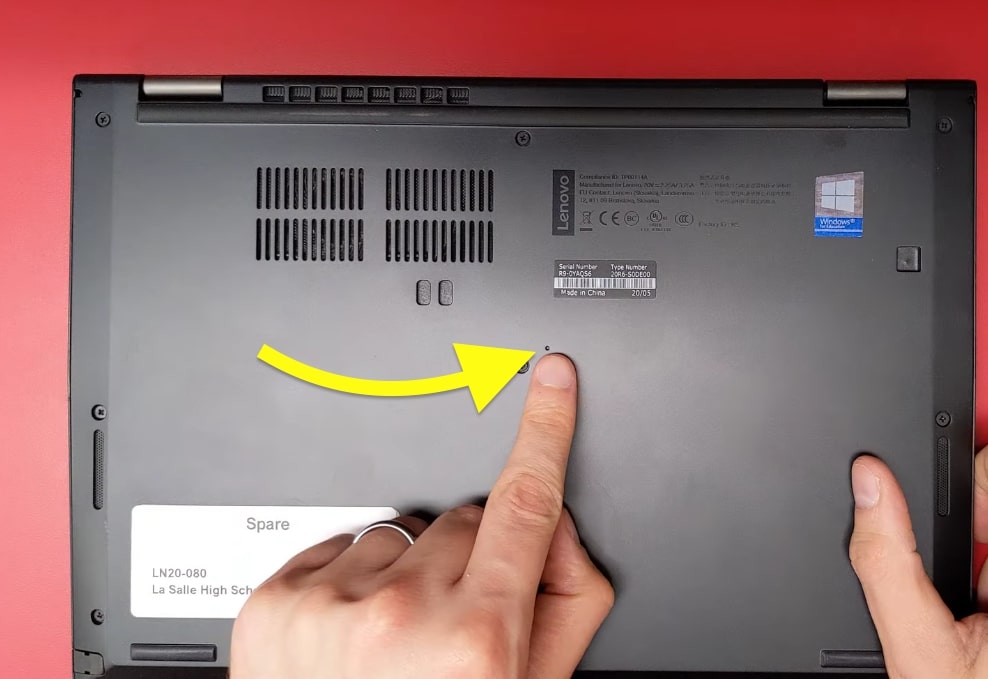
Grab a pin or a paper clip and insert it into the reset pinhole.
Press and hold the reset button for up to seven seconds.
Once done, open the laptop lid and press the power button to turn it on.
Once turned on, try connecting your external monitor and see if the laptop detects it now.
Don’t worry if your Lenovo laptop has no physical reset button; you can still reset it via BIOS.
Shut down the laptop.
Press F1 and the power key simultaneously and wait until the laptop enters BIOS mode.
Once in BIOS mode, press the F9 key to reset the settings to factory defaults.
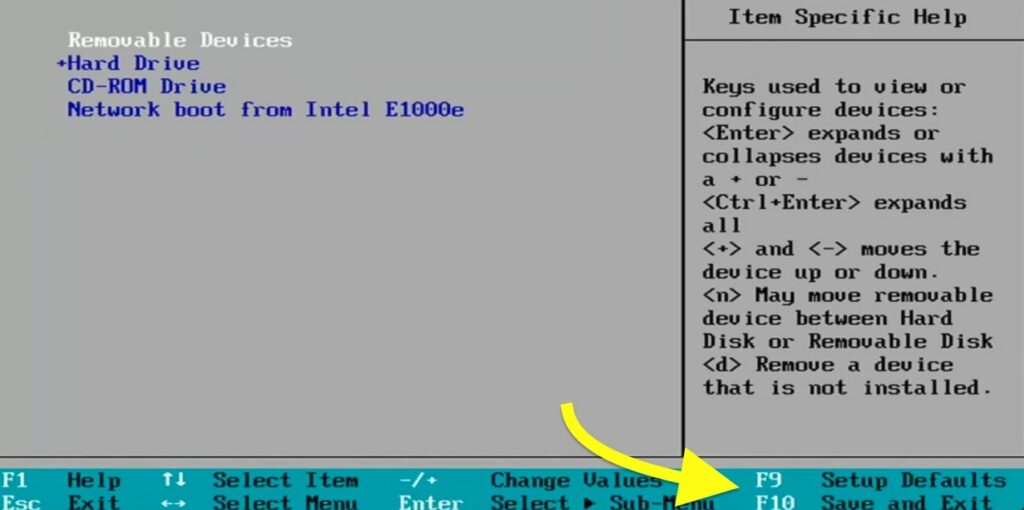
Press the F10 key to save the settings and configurations.
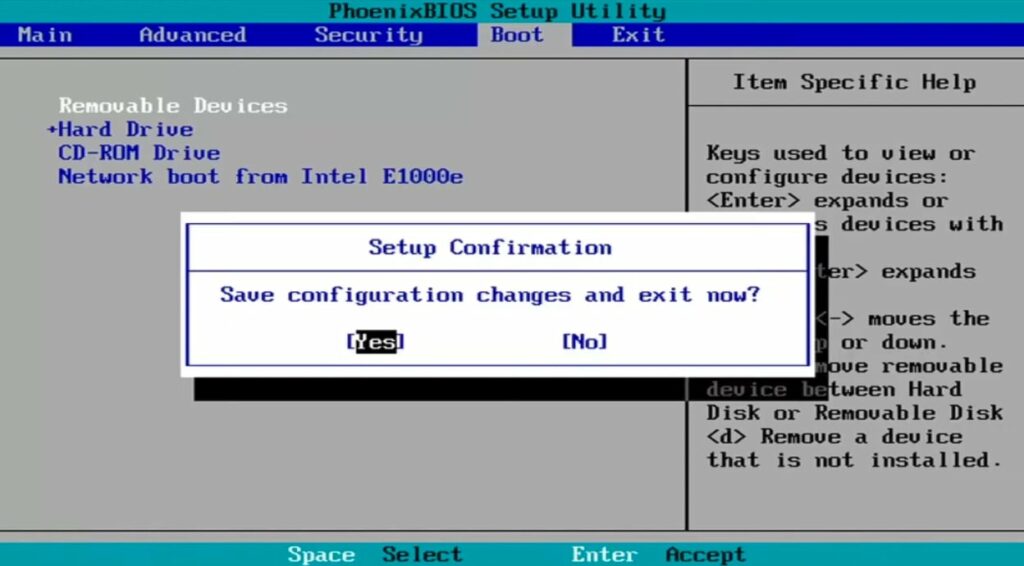
A popup will appear asking if you want to save configuration changes and exit now.
Use the arrow keys to select Yes and press Enter.
The laptop will restart and boot normally. Once turned on, connect the external monitor and see if the monitor is detected.
Select The Correct Input Source On The Monitor
After connecting the monitor to your Lenovo laptop, do you find any error message saying no input signal found or no input selected, etc., on the screen?
If yes, selecting the correct input source from the monitor settings will help fix the problem.
Even though every monitor these days can automatically detect the input source, it may not work at times. All you need to do is head to monitor settings and select the correct input.
Connect your Lenovo laptop to the monitor.
Press the “Menu” button on the monitor. It is mainly found on the bottom bezel or towards the right back side.
Use the navigation button and select an option that says something like “Source“, “Source/input“, “Input“, “Source Control“, etc. The exact option name differs depending on the monitor brand and model.
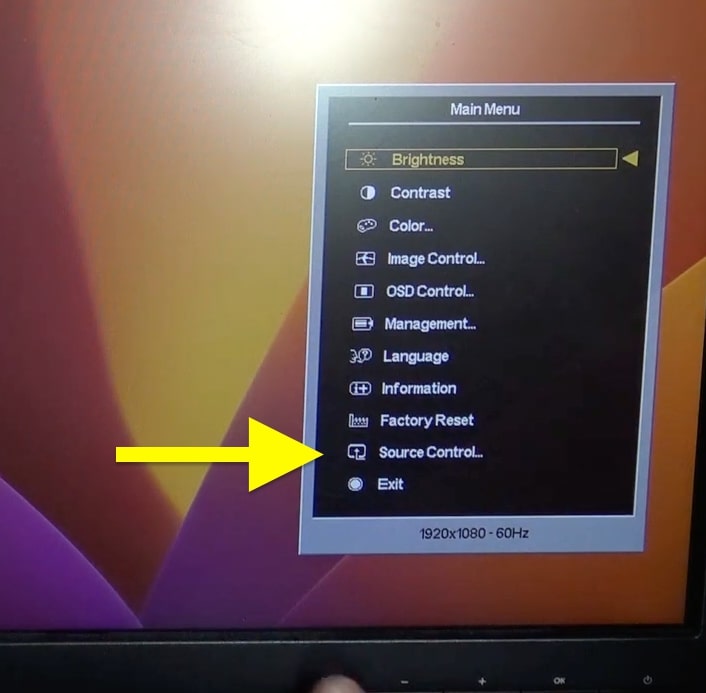
Now, you need to select the correct input source. If you connected your Lenovo laptop to the monitor via HDMI, select “HDMI.” If it is via USB Type C, then select it.
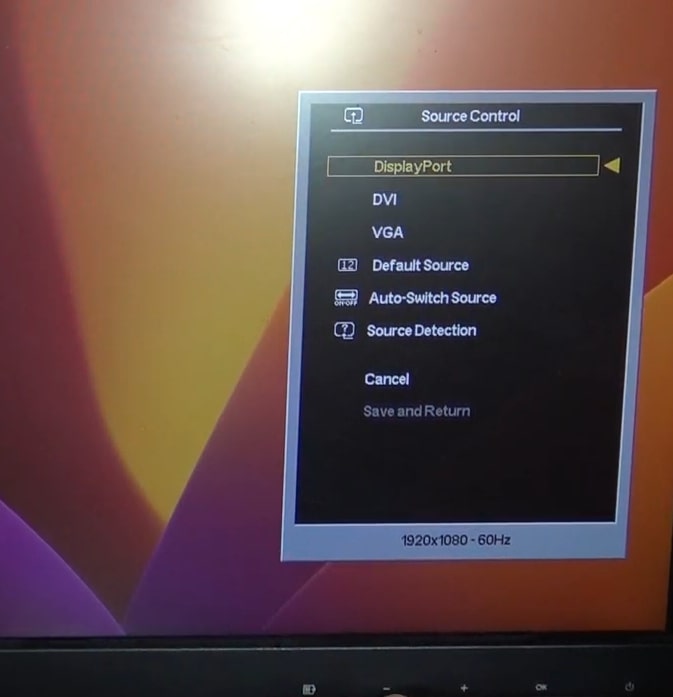
See if it works.
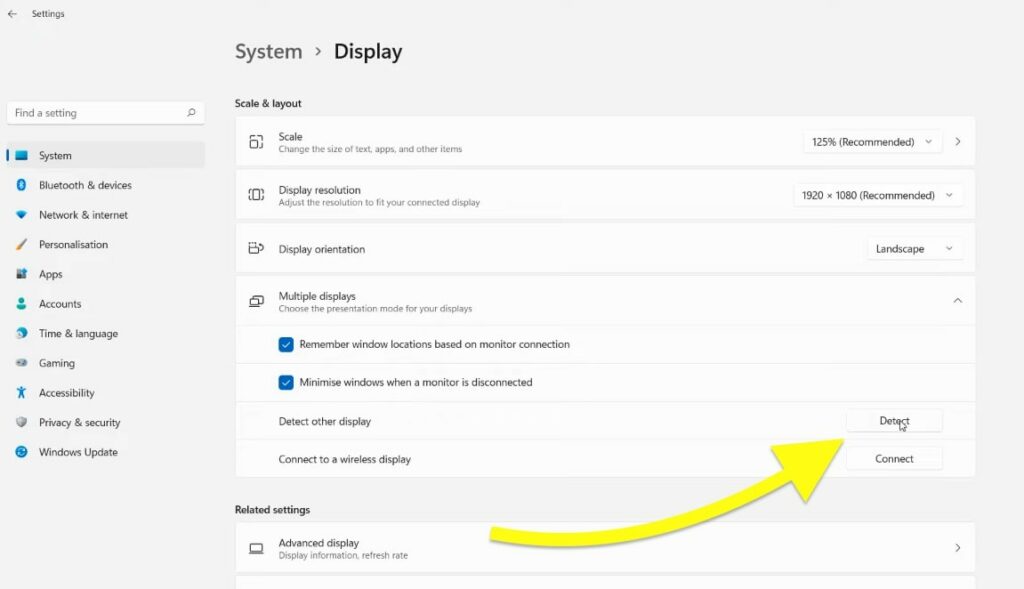
Detect Display On Windows Settings
The next thing to do is manually detect the display on your Lenovo laptop via Windows settings.
Follow the steps below to see how.
Open “Windows settings“.
Select “System“.
Select the “Display” option.
Scroll down and expand the “Multiple displays” option.
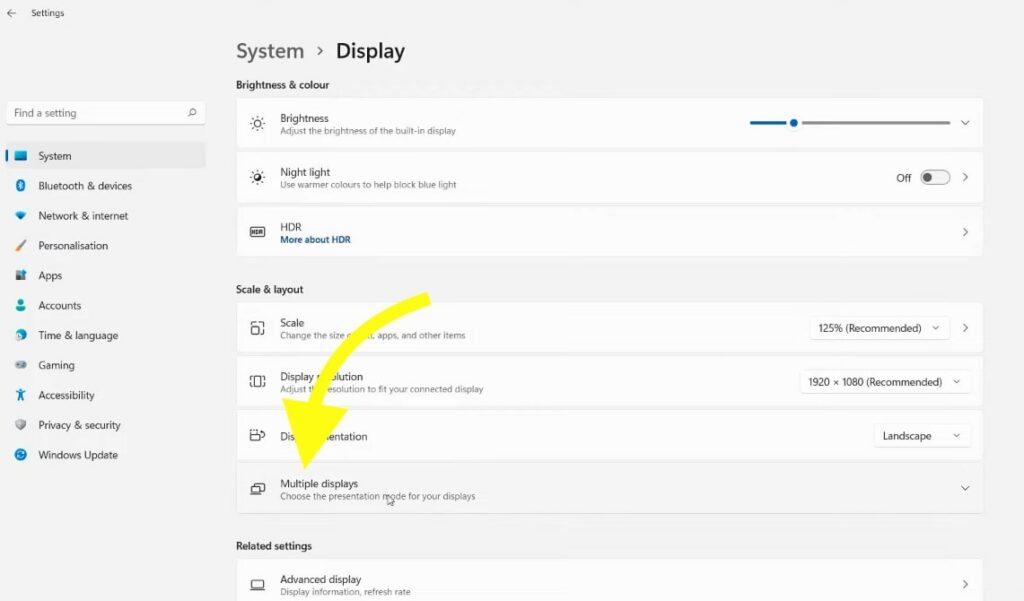
Click the “Detect” button next to the Detect other display option.
Ensure The Cable Is Connected Properly
Are you sure the HDMI cable, USB Type-C, or display port cable is connected properly?
If one end of the cable is not correctly connected to the laptop or the monitor, your Lenovo laptop may not detect the monitor.
Firstly, unplug the HDMI cable from your laptop and monitor. Plug them back in and apply some pressure to lock them in place.
If your monitor has multiple HDMI ports, consider connecting the HDMI cable to a different port and see if it works.
Closely examine the cable to see if it is damaged or if the cable is frayed. If yes, consider replacing the HDMI cable and try again.
Factory Reset Monitor
If your monitor picture settings are messed up or misconfigured, it won’t detect HDMI or other inputs.
Factory resetting the monitor will help fix the problem in a single click.
Follow the steps below to factory reset your monitor:
Depending on the monitor brand and model, the option to factory reset the monitor differs. Refer to the monitor manufacturer’s website or user manual to see how to factory reset them.
Press the “Menu” button on the monitor.
Use the up and down arrow buttons to select the factory reset option.
If you can’t find the Factory Reset option in the main menu, it may be one step under the “Other” or “Advanced settings“.
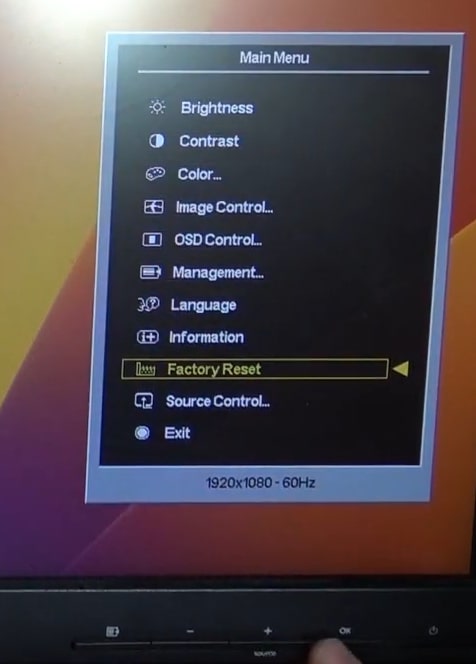
On the popup that appears, confirm factory resetting the monitor.
Once reset, connect the HDMI cable to the monitor and see if it detects now.
Update Drivers
Updating the graphics/display driver can help you fix display-related problems when connecting external displays.
If your laptop is running an outdated the graphics driver version, follow the steps to update to the newest version.
Press the Windows Key + R to open Windows Run.
Enter devmgmt.msc and hit enter to open the Device Manager.
Expand the Display Adapter section.
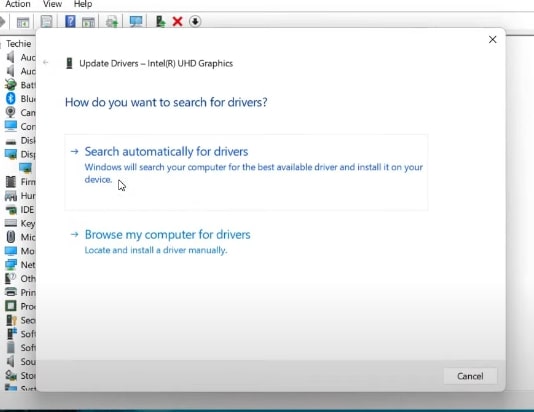
Right click on your graphics driver and click the Update driver option.
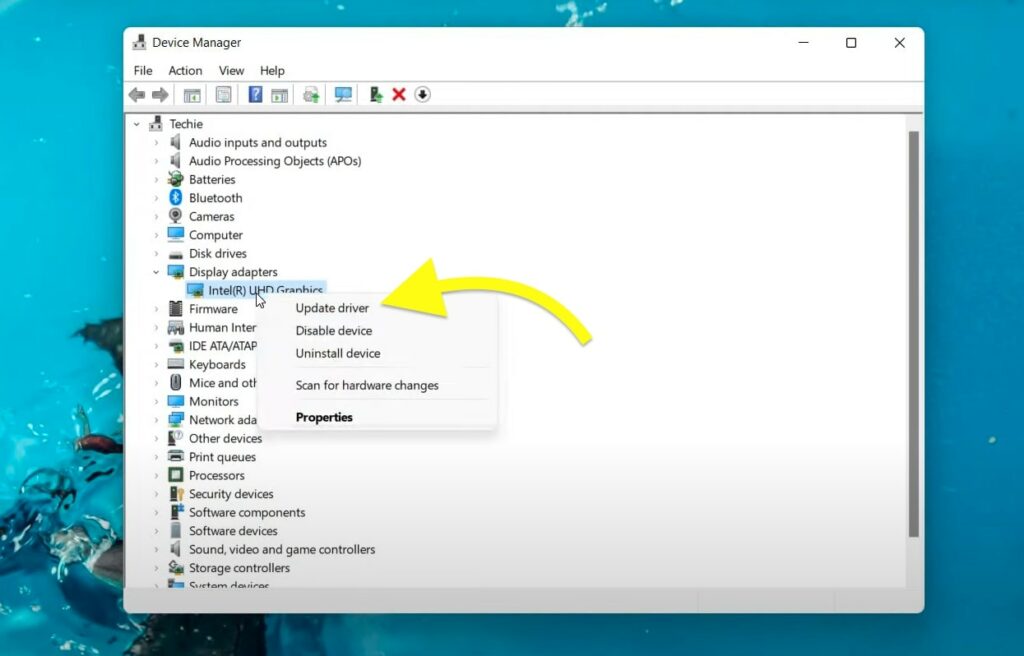
Select Search automatically for the drivers option and wait for a few moments while it finds and update the driver, if any.
Once done, restart your Lenovo laptop and connect the monitor.
Contact Support
The last thing to do if none of the troubleshooting steps helped you fix the problem is to contact support. But who to contact? We don’t know whether the problem is with the laptop or the monitor.
Here’s a way to find out whether the problem is with the laptop or monitor:
If you have an extra monitor, try connecting the laptop to a different monitor and see if it works. If it works, it means the problem is with the monitor. If the laptop still does not detect the monitor, the issue is with your laptop.
Follow the link above to contact Lenovo, hopefully, they should find a resolution.
Depending on the monitor’s brand, visit the manufacturer’s website and find the contact information. Get in touch with the support team and ask for help.
What’s Next?
Lenovo laptop not detecting external monitor is a common problem among users. Using the reset button on the laptop or, resetting the settings on BIOS, selecting the correct input source on the monitor, resetting the monitor settings, or updating the firmware should help fix the problem.
Ensure you properly connect the HDMI cable to monitor and apply firm pressure to ensure the cable is snugged well inside the port.
If nothing helps, try connecting your Lenovo laptop to a different monitor and see if it the issue is with the laptop or monitor and then contact support for help.